What is an L-Screen?
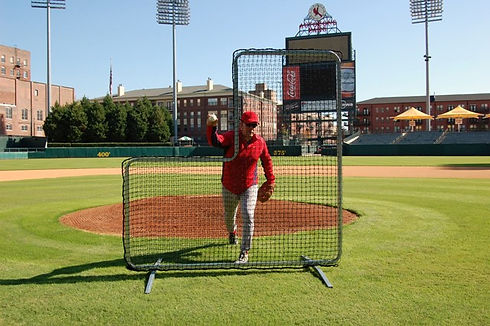
An L-Screen is a protective structure designed to deflect balls that are hit directly back at the pitcher. Recently Major League Baseball has been tracking exit velocity (the velocity of the ball when it leaves the bat) and found that the hardest hit ball of the 2017 season was hit by Giancarlo Stanton at 122.2 mph. The pitcher, after each pitch, is often left in a defenseless position as they had released the ball less than half a second prior to contact with the bat while being less than 60 feet away. As you can imagine this can be extremely hazardous for pitchers if the ball were to be hit directly back at them at such a high velocity. Because of this risk, the L-Screen was developed to protect the pitcher during batting practice.
The Problems
-
Stability
-
Lack of resources
-
Too large to transport
-
Price
Stability
The most important requirements when building an L-Screen are durability and stability. This project would be an automatic failure if it is unable to protect the pitcher from a hard hit ball. It would also be considered a failure if it was unable to withstand the continuous barrage of balls over time. For these reasons I needed to choose durable materials. I have worked with both Aluminum and Steel while at Smead and decided that although aluminum may be lighter, which would be beneficial for transportation, CRS would be the better option. It would better retain its rigidity after time than aluminum and would warp less due to the applied forces. Maintaining its original shape is vital as my design involves telescopic parts with a straightness tolerance to allow for sliding and any deformation can compromise this tolerance. The netting was also an important factor as replacing the netting could be the most common expense. After researching netting gauges I decided on #42 netting to minimize maintenance which was one size larger than the common netting used in batting cages and backstops throughout baseball and softball.
Lack of Resources
Production of this project was conducted while I was a student living in an apartment. I did not have access to a machine shop or a garage. This was taken into consideration throughout the design process. I knew that my tools would be limited to a handsaw and a drill. Because of these limitations, my goal was to design the framework with as few cuts as possible. Standard lengths of square tubing were incorporated into the design as often as possible to eliminate saw cuts. Tolerances were also adjusted with these situations in mind. Any area that required a cut using a handsaw was designed to be located in an area that did not require a high tolerance. The concentricity of the holes was the most difficult aspect of my project to accomplish. The most extensive area of the project required eight concentric holes to allow clearance for bolt to slide in and out as an anchoring pin. This was very difficult to accomplish with a hand drill. I was able to create this feature by drilling the exterior holes to size (1/4") while drilling the interior holes to a larger size to allow for easier alignment. This allowed for less accuracy when drilling the holes with a hand drill while still accomplishing the goal of allowing the insertion and removal of the anchoring pin.
Transportation
This issue was the initial problem that lead to creating my own L-Screen. I could have easily purchased an L-Screen online as they are easily available. However, the L-Screens that I could purchase were all too large to transport in my small car. They are designed to either be left at the baseball fields or to be transported in the back of a truck. I however, did not wish to leave my expensive item at a public park and I am unable to transport it from my apartment to the fields on a regular basis because I do not own a truck. This is when I came up with the idea to create a collapsible L-Screen that could be expanded when needed and compressed when transported and stored. This is where the majority of the design took place. After a few design ideas I settled on one that involved a rectangular base with two sliding U shaped inserts that would extend and retract from the base to create the L shaped extensions. This design worked very well as I was able to control the size very easily and it was relatively simple to adjust.
Price
The final issue that needed to be resolved before I decided to commit to this project was to figure out how much it would cost. My budget was based on the research I had done online for commercial L-Screens. I was willing to spend $50 more than a good quality online L-Screen. This ended up being around $250. I then did research online for everything that I would need to purchase. I added up the price for the materials and found that it would cost fairly close to my budget. This was discouraging as I knew that if there were an expenses that I had not accounted for I would be over budget. I eventually decided to go forward with my project as a learning experience and that if I ended up slightly over budget I would be alright. No issues arose with the materials so I ended up on budget until the netting. I decided before purchasing the netting that upgrading to the next thickest size would be more cost effective in the long run and decided to pay the extra $25. This put me over budget at $275 but I had made a premeditated decision to adjust the total spent to improve the overall durability of the netting. After using my L-Screen on a few occasions I am still satisfied with my decision as the netting has held up very well.
 |  |  |
|---|---|---|
 |  |  |
 |  |  |
 |  |  |
Does It Work?


